How to Fix VALORANT Not Launching on Windows 11 (VAN9001 & VAN9003)
If VALORANT won’t launch after upgrading to Windows 11 and you’re seeing errors like VAN9001 or VAN9003, don’t worry — this is a common issue.
In most cases, the problem happens because Secure Boot or TPM 2.0 is disabled on your PC.
This guide shows you exactly how to fix it step by step.Why VALORANT Won’t Launch on Windows 11, like TPM 2.0,Secure Boot Requirements
Quick Fix (TL;DR)
- Enable Secure Boot in BIOS
- Make sure TPM 2.0 is active
- Confirm both settings in Windows using
msinfo32 - Restart your PC and launch VALORANT again
Detailed instructions are below.
Why VALORANT Won’t Launch on Windows 11
Windows 11 introduced stricter security requirements.
VALORANT’s anti-cheat system (Vanguard) now requires:
- Secure Boot
- TPM 2.0
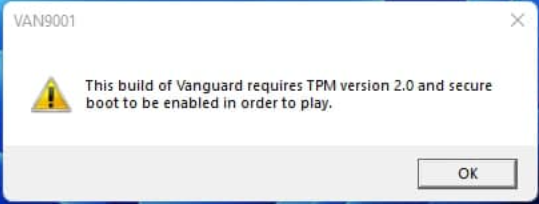
If either of these is disabled, the game will refuse to start and display errors like:
This build of Vanguard requires TPM version 2.0 and Secure Boot to be enabled.
What Causes VAN9001 and VAN9003?
These errors usually mean:
- Your system is running in Legacy / CSM mode
- Secure Boot is turned off
- TPM 2.0 is disabled in BIOS
Even if Windows 11 is installed successfully, these settings may still be inactive.
How to Fix VALORANT Not Launching (Step-by-Step)

Step 1: Enter BIOS
- Restart your PC
- Press
Delete,F2, orEscrepeatedly during startup - You’ll enter your BIOS / UEFI menu
(The exact key depends on your motherboard.)
Step 2: Enable UEFI Mode
Find Boot Mode or CSM:
- Set Boot Mode to UEFI
- Disable CSM / Legacy Mode
Save settings if prompted.
Step 3: Enable Secure Boot
Below are the steps to enable Secure Boot on motherboards from various manufacturers in order to resolve error codes VAN9001 and VAN9003.
For MSI Motherboards
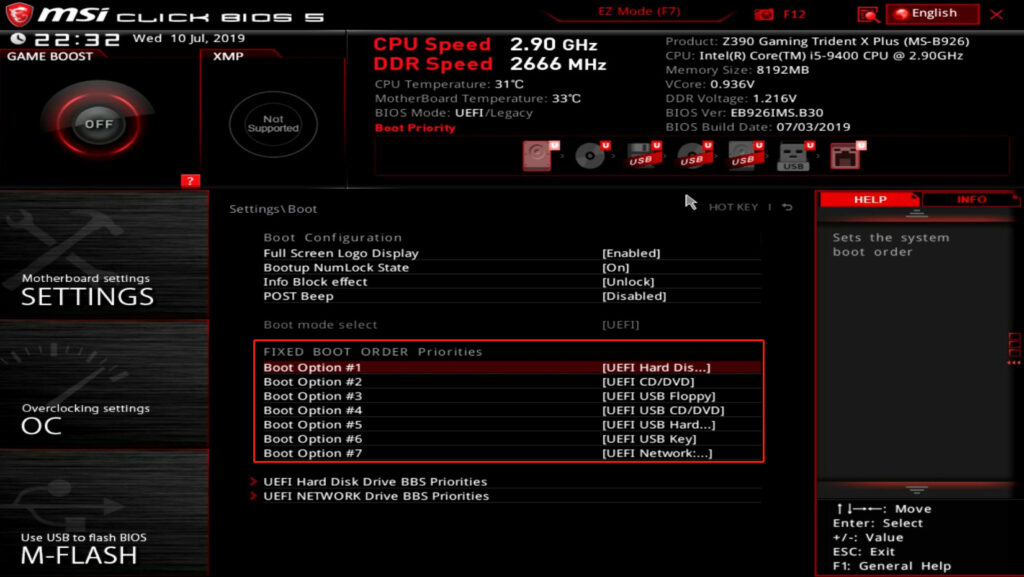
Step 1:
Enter the BIOS, then go to Settings > Advanced > BIOS CSM/UEFI Mode, and change it to UEFI.
Step 2:
Return to Settings > Security > Secure Boot, and select Enroll All Factory Default Keys.
Step 3:
Still under Settings > Security > Secure Boot, change Secure Boot to Enabled.
Step 4:
Press F10 to save and exit. You're done.
For ASUS Motherboards
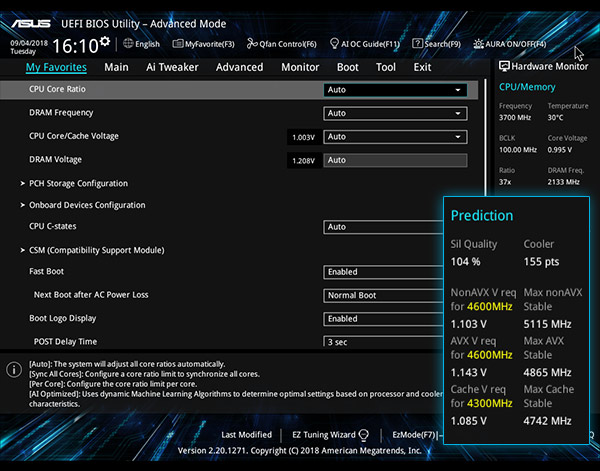
Step 1:
Enter the BIOS, switch to Advanced Mode, then go to Boot > Secure Boot Menu, and set the mode to UEFI.
Step 2:
In the same Secure Boot Menu, change Secure Boot State to Enabled.
Step 3:
Press F10 to save and exit. You're done.
For ASRock Motherboards
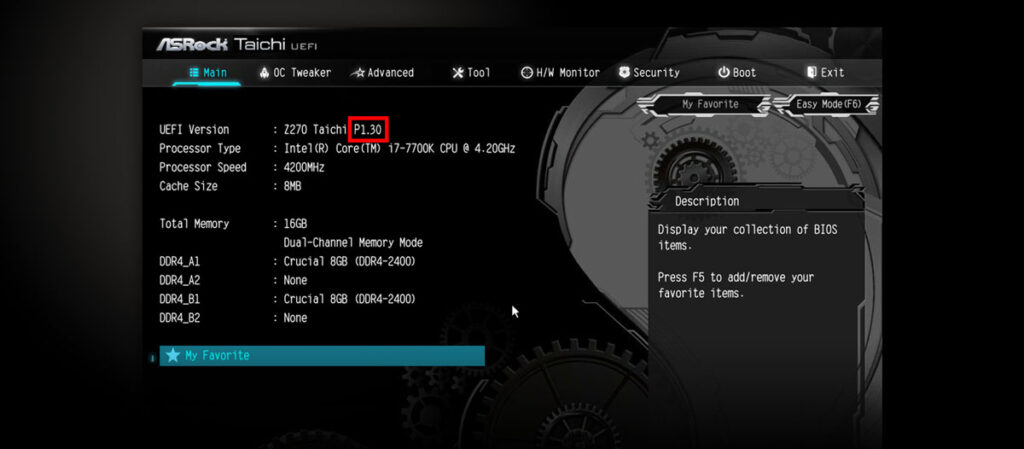
Step 1:
Enter the BIOS, go to Boot, and disable CSM.
Step 2:
Go to Security and enable Secure Boot.
Step 3:
Press F10 to save and exit. You're done.
Step 4: Enable TPM 2.0
Look for:
- Intel systems: PTT
- AMD systems: fTPM
Set it to Enabled.
Save changes and exit BIOS.
Your PC will reboot.
How to Check Secure Boot in Windows
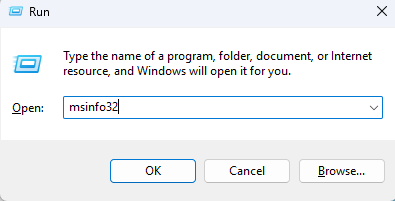
After rebooting:
- Press
Windows + R - Type
msinfo32 - Press Enter


Confirm:
- BIOS Mode: UEFI
- Secure Boot State: On
If both are correct, launch VALORANT again.
Frequently Asked Questions
Q. What’s the difference between VAN9001 and VAN9003?
Both errors indicate missing Windows 11 security requirements.
They usually mean Secure Boot or TPM 2.0 is disabled.
Q. Do I need TPM 2.0 on Windows 10?
No. This requirement mainly applies to Windows 11.
Q. I enabled Secure Boot but VALORANT still won’t launch. What now?
Double-check:
- BIOS Mode = UEFI
- Secure Boot = Enabled
- TPM / fTPM / PTT = Enabled
If everything looks correct, try reinstalling Riot Vanguard.
Q. Can this damage my PC?
No. Secure Boot and TPM are standard Windows security features and safe to enable.
Summary
If VALORANT won’t start on Windows 11:
- Enable UEFI
- Turn on Secure Boot
- Enable TPM 2.0
- Verify settings using
msinfo32
This fixes VAN9001 and VAN9003 for most players.